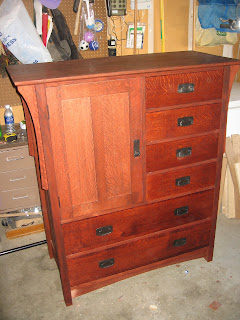
For a long time now, I've been living out of one of those damned Rubbermaid dressers from Wal-Mart. It's made me feel a little white trash, so I took a couple of weeks off from working on Cathi's house and bought some quartersawn white oak for some plans that I've had for years. Six hundred dollars later, my truck now popping a wheelie up 680, I unload a couple of hundred pounds of QSWO, poplar and plywood into the garage. The dresser is called a gentleman's chest, and is a standard Arts & Crafts piece of bedroom furniture. I really liked the asymmetrical look and the flexibility of the cabinet opposite the smaller drawers.
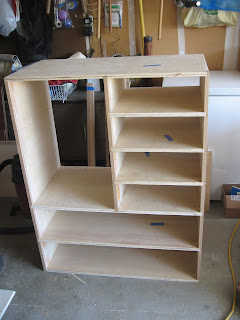
I started cutting out the parts of the case (which gives the frame rigidity and reduces seasonal wood movement, which would cause the drawers to bind) being extremely careful to cut them as perfecty square as possible. Taking the time to make these parts perfect will yield serious dividends later on. I cut the dadoes in the case for the intersecting parts, making sure they all aligned perfectly. Any error would be noticeable and interfere with drawer movement. Once all of the parts for the case were made, I glued it up in stages, according to the directions and went to work on the oak. Carefully selecting the wood for optimal aesthetics. The medullary ray flake/fleck is one of the most striking aspects of quartersawn white oak. Ironically, Gustav Stickley used ammonia fuming on his furniture to subdue the ray flake to give his pieces a more homogenous look. Most woodworkers today take great pains in formulating their finishes to celebrate this effect, which in certain light and at certain angles is actually reflective.

I cut out the dozens of pieces of QSWO to the dimensions in the plans, labeled each with a part number and the "show" side, then starded applying the parts to the case. I had to cut wide slabs of QSWO into thin panels using a technique called resawing, which means holding the board on edge and running it across the band saw (the $200 band saw I got off of CraigsList in Austin for $80 because the guy didn't want to have to put it together). That was first for me and required me to make a special jig for the bandsaw to align the board properly. Luckily, I was able to plane the panels down to the proper thickness, which means I didn't get off center too much. The panels were prestained so no unstained edges might show. The sides went together first, then when cured, they were applied to the case. This formed the inside dimensions I needed to apply all of the oak to the plywood edge, thus hiding the plywood and making the entire dresser appear to be of solid oak.
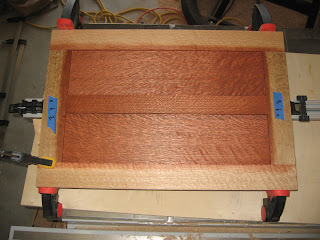
The top got glued up and all of the trim pieces were applied. It was starting to look like a piece of furniture. Camping and sailing got in the way, but when we got back, I dove back in, finishing the case. It was now time to make the drawers.
Following the directions, I planed $100 worth of 3/4"+ poplar down to the 1/2" in the plans. Since the large drawers were taller than the poplar was wide, I had to glue them up. The next day, when picking up the cured 1/2" panels, they snapped off on the glue lines. Quite bummed out, I went and bought more 3/4" poplar and started building the drawers without planing it down. I reasoned that it would be much beefier than the flimsy 1/2" stuff. Unfortunately, this caused a whole slew of modifications in the drawer dimensions. When it came time to cut the drawers' lock joint, I setup the table saw for the original 1/2" thickness and proceeded to make the first set of cuts on all of the applicable boards. When I realized I had made a mistake, I then had to figure out how to salvage the drawer stock. I settled on a symmetrical "T" shaped joint, which was necessarily thinner than the sturdier "L" joint I should have had, but there was nothing I could do at this point.
I also have to mention that I originally had planned on making my dresser with dovetail joints, but after messing with the $200 dovetail jig I bought for the occasion, having the spindle come out of my new router (which is an all day repair job), and finding out that Stickley pieces have a lock joint, I settled on what I thought was going to be the lesser of two evils.

When glueing up the drawers, I realized I had made another mistake. The back of the drawer should be shorter than the sides, so the drawer bottom overlaps the back for nailing purposes. I had made the back of the drawer the same height, cut the groove for the drawer bottom in the back, and had cut the drawer bottom short enought to fit into the back groove. The drawer bottoms should've been 1/2" deeper. Because drawer bottoms are loosely fit to allow for seasonal wood expansion, they aren't glued in. As a result, my drawer bottoms are completely loose, captured in the groove on all four sides, instead of nailed/screwed in the back, so they have a nice, loose sound. I hope that when I pile my tidy whities into the drawers, the weight and muffling will compensate.
When fitting the drawers, each drawer had to be numbered and paired with each opening in the case, based on a best fit trial and error process. There were slight differences in the opening dimensions and drawer sizes that seem to me almost unavoidable, considering the care I took. Each drawer was custom sanded to fit into it's respective slot.

When I was happy with the fit, it was time to make the QSWO faces for each drawer. Once again, the required height was taller than my board width, so I broke out the glue once again. This time, everything went well, and I had some nice looking boards with glue lines that were mostly inconspicuous. The medullary ray flake was spectacular on the board I saved for these parts, and the front of the dresser is a writhing exploding celebration of QSWO. Each face was custom fit into its respective drawer, then double stick taped to the drawers with shims underneath to center them in the opening. Gingerly removed, making sure to keep the tape from slipping, the drawers were screwed to the faces from the inside. These screw holes indexed the faces to the drawers, so I was able to remove them and put several coats of hand-rubbed polyurethane on them, which really brings out the luster of the finish (which is TransTint Reddish Brown #6003, thanks to Kim's dad Joe). I still have to disassemble everything and put several coats of poly on the case, but otherwise, it's a done deal. It weighs about 200 pounds, so getting it into the house is going to be interesting. It exactly matches the headboard I made before we left Austin, so I'm on my way to a complete bedroom set. I looked online, and comparable dressers are going for $2,000-$2,500, so I think it was a good investment. I'm looking forward to it being in place, loading it up, and moving the Rubbermaid dresser out into the shop for tool storage.


